Today is my dad's birthday in addition to my sister's. Last year, I asked him what his favorite dessert was and he told me when he was a kid, he had these whoopie pies with crushed peppermint candies in them and that those were his favorite. I tried making them and experimented with different mints. I tried those soft, butter mints because I thought regular mints would be to crunchy, but he didn't like them as much. He said they're best with the crunchy kind. I also learned that when these mints sit on liquid, for example mixed with marshmallow whoopie pie filling, they tend to "melt" and become sticky. So, if you plan to add peppermints, which I highly recommend, don't stir them into the filling or roll the pies in them until right before serving them.


My mom and sister got me the cutest whoopie pie book last Christmas by Sarah Billingsley and Amy Treadwell called "Whoopie Pies: Dozens of Mix'em, Match'em, Eat'em Up Recipes". They have both sweet and savory recipes for the cakes and fillings that make it easy to mix and match flavors, not to mention great tips to have them come out perfectly every time. I'll add this fun little book to my books list for your convenience.
If you are a vegetarian, you are probably thinking "Marshmallows? Wait a second..." If you're not, you should know that marshmallows usually have gelatin in them and are therefore not vegetarian. However, much to my delight, marshmallow fluff does not contain gelatin, so you can enjoy these little sandwich cakes to you're heart's content.
Classic Whoopie Pies
Cakes:
1 2/3 cups all-purpose flour
2/3 cup unsweetened cocoa powder
1 1/2 tsp baking soda
1/2 tsp salt
4 tbs unsalted butter at room temperature
4 tbs vegetable shortening
1 cup packed dark brown sugar
1 large egg
1 tsp vanilla extract
1 cup milk
Position a rack in the center of the oven and preheat it to 375F. Line two baking sheets with parchment paper.
Sift together the flour, cocoa powder,baking soda and salt. In a bowl (either with a mixer with the paddle attachment or with a hand-held mixer), beat together the butter, shortening and brown sugar on low speed until just combined. Increase the speed to medium and beat until fluffy and smooth, about 3 minutes. Add the egg and vanilla and beat for another 2 minutes.
Add half the flour and half the milk to the batter and beat on low until just incorporated. Scrape down the sides of the bowl. Add the remaining flour and milk and beat until completely combined.
Using a spoon, drop about 1 tablespoon of batter onto one of the prepared baking sheets and repeat, spacing them at least 2 inches apart (they really do spread and puff up). Bake one sheet at a time for ten minutes each, or until the pies spring back when pressed gently. Remove from oven and let the cakes cool on the sheet for about 5 minutes before transferring them to a rack to cool completely.
Makes about 48, 2" cakes.
Filling:
1 1/2 cups Marshmallow Fluff
1 1/4 cups vegetable shortening
1 cup confectioner's (powdered) sugar
1 tbs vanilla extract
In the work bowl of a stand mixer with the paddle attachment, or in a large bowl with a hand-held mixer, beat together the marshmallow fluff and the vegetable shortening, starting on low and increasing to medium speed until the mixture is smooth and fluffy, about 3 minutes. Reduce mixer speed to low, add the confectioner's sugar and the vanilla, and beat until incorporated. Increase mixer speed to medium and beat until fluffy, about three minutes more.
To assemble: You can pipe the filling between the cakes if you want or spoon it on. This is the stage where I add the crushed peppermint candies. I also like to break a few mints more finely and roll the edges of the whoopie pies in it when they are filled. This makes them very sparkly and glamorous (:
Happy birthday, Dad! <3

 |
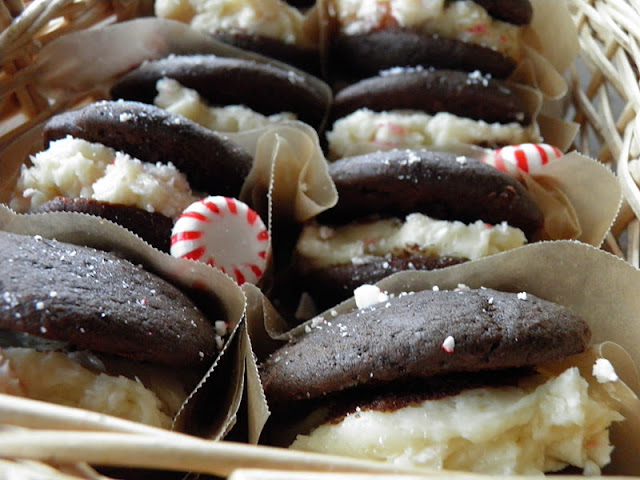
| I love the contrast of the bright whites and red, I thought it was really stunning. |


My mom and sister got me the cutest whoopie pie book last Christmas by Sarah Billingsley and Amy Treadwell called "Whoopie Pies: Dozens of Mix'em, Match'em, Eat'em Up Recipes". They have both sweet and savory recipes for the cakes and fillings that make it easy to mix and match flavors, not to mention great tips to have them come out perfectly every time. I'll add this fun little book to my books list for your convenience.
If you are a vegetarian, you are probably thinking "Marshmallows? Wait a second..." If you're not, you should know that marshmallows usually have gelatin in them and are therefore not vegetarian. However, much to my delight, marshmallow fluff does not contain gelatin, so you can enjoy these little sandwich cakes to you're heart's content.
Classic Whoopie Pies
Cakes:
1 2/3 cups all-purpose flour
2/3 cup unsweetened cocoa powder
1 1/2 tsp baking soda
1/2 tsp salt
4 tbs unsalted butter at room temperature
4 tbs vegetable shortening
1 cup packed dark brown sugar
1 large egg
1 tsp vanilla extract
1 cup milk
Position a rack in the center of the oven and preheat it to 375F. Line two baking sheets with parchment paper.
Sift together the flour, cocoa powder,baking soda and salt. In a bowl (either with a mixer with the paddle attachment or with a hand-held mixer), beat together the butter, shortening and brown sugar on low speed until just combined. Increase the speed to medium and beat until fluffy and smooth, about 3 minutes. Add the egg and vanilla and beat for another 2 minutes.
Add half the flour and half the milk to the batter and beat on low until just incorporated. Scrape down the sides of the bowl. Add the remaining flour and milk and beat until completely combined.
Using a spoon, drop about 1 tablespoon of batter onto one of the prepared baking sheets and repeat, spacing them at least 2 inches apart (they really do spread and puff up). Bake one sheet at a time for ten minutes each, or until the pies spring back when pressed gently. Remove from oven and let the cakes cool on the sheet for about 5 minutes before transferring them to a rack to cool completely.
Makes about 48, 2" cakes.
Filling:
1 1/2 cups Marshmallow Fluff
1 1/4 cups vegetable shortening
1 cup confectioner's (powdered) sugar
1 tbs vanilla extract
In the work bowl of a stand mixer with the paddle attachment, or in a large bowl with a hand-held mixer, beat together the marshmallow fluff and the vegetable shortening, starting on low and increasing to medium speed until the mixture is smooth and fluffy, about 3 minutes. Reduce mixer speed to low, add the confectioner's sugar and the vanilla, and beat until incorporated. Increase mixer speed to medium and beat until fluffy, about three minutes more.
To assemble: You can pipe the filling between the cakes if you want or spoon it on. This is the stage where I add the crushed peppermint candies. I also like to break a few mints more finely and roll the edges of the whoopie pies in it when they are filled. This makes them very sparkly and glamorous (:
Happy birthday, Dad! <3
This looks super yummy. You are so good at food photography laurotte! all the pictures are so artistic
ReplyDeleteAw thanks (:
ReplyDelete