I'm sorry! This post has been moved to my new site. Find it here.
Friday, November 25, 2011


Thursday, November 24, 2011
Thimble Gingerbread Spice Meringues
These little treats gave me a lot of trouble, it took me a few tries to get them right, but I learned a lot about meringues! Here's a great link for any questions you might have, even though this site seems to be intended for meringue pie topping.
I learned to add 1/4 cup of sugar per egg white, to add the sugar one tablespoon at a time and to bake the meringues for a long time at a low temperature to get them to dry out properly.


Thimble Gingerbread Spice Meringues
2 room-temperature egg whites
1 tsp cream of tartar
1/2 cup granulated sugar
1 heaping tsp ground ginger
1 tsp ground cardamom
1 tsp ground cinnamon
A small ziploc bag
Preheat your oven to 200F.
Prepare two cookie sheets by buttering and covering with parchment. Any loose ends may fold over your meringues in the oven and damage them. Thoroughly clean and dry your egg beaters, a spatula and a glass or metal bowl. Any fat or grease will break down your meringues.
Start whipping the whites in the bowl until foamy and bubbly. Sprinkle the cream of tartar and continue to blend until you have reached the soft peak stage. Start adding the sugar one tablespoon at a time. Add the spices with the last few tablespoons of sugar. Whip until you have stiff peaks.
Carefully scrape the meringue into the ziploc. Seal the bag and cut a small hole in the corner. Pipe small, thimble-sized meringues onto the parchment. You don't need to leave much space between them because they don't expand much, so you can really fit a lot on each sheet.
Bake for at least one hour. You can check on them periodically, but don't jostle them. They are ready when they feel like they have a kind of firm skin on them. If you want to test them for doneness, you can pull one off of the pan and it should instantly cool and become crispy. The edges and tips may also be a light golden brown. Be careful not to burn them or take them out too early! Take them out and let them cool. They should cool quickly and it will become clear almost at once if they dried enough, because they will be crisp and hard. I realized from my failed batches that the smaller they are, the quicker they dry so these thimble-sized meringues should be an easy first experience with meringues. I know they were much easier for me!
Enjoy! <3
I learned to add 1/4 cup of sugar per egg white, to add the sugar one tablespoon at a time and to bake the meringues for a long time at a low temperature to get them to dry out properly.


Thimble Gingerbread Spice Meringues
2 room-temperature egg whites
1 tsp cream of tartar
1/2 cup granulated sugar
1 heaping tsp ground ginger
1 tsp ground cardamom
1 tsp ground cinnamon
A small ziploc bag
Preheat your oven to 200F.
Prepare two cookie sheets by buttering and covering with parchment. Any loose ends may fold over your meringues in the oven and damage them. Thoroughly clean and dry your egg beaters, a spatula and a glass or metal bowl. Any fat or grease will break down your meringues.
Start whipping the whites in the bowl until foamy and bubbly. Sprinkle the cream of tartar and continue to blend until you have reached the soft peak stage. Start adding the sugar one tablespoon at a time. Add the spices with the last few tablespoons of sugar. Whip until you have stiff peaks.
Carefully scrape the meringue into the ziploc. Seal the bag and cut a small hole in the corner. Pipe small, thimble-sized meringues onto the parchment. You don't need to leave much space between them because they don't expand much, so you can really fit a lot on each sheet.
 |
| You can fit a lot of meringues on each pan! |
Enjoy! <3
Happy Thanksgiving on Tiramipursuit!
Happy Thanksgiving everybody!
Here are some pictures from what I made yesterday and today. I worked all yesterday and today and then got to go to two family gatherings. Now we're all home and I'm watching Elf with my siblings and parents.
I wanted to share my pictures from today and I'll share the recipes over the next few days! I hope everyone had a chance to spend time with loved ones today!

 Find the recipe for this Chocolate Truffle Cake here.


Here are some pictures from what I made yesterday and today. I worked all yesterday and today and then got to go to two family gatherings. Now we're all home and I'm watching Elf with my siblings and parents.
I wanted to share my pictures from today and I'll share the recipes over the next few days! I hope everyone had a chance to spend time with loved ones today!
 |
| Vegetarian stuffing from scratch! Turned out pretty good! |

 |
| Dark Chocolate Truffle Cake with whipped cream. |

 |
| Gingerbread cake squares. |

 |
| Thimble gingerbread spice meringues. |


 |
| Little guys. They're so cute (: |
Tuesday, November 22, 2011
Chocolate Peppermint Whoopie Pies
Today is my dad's birthday in addition to my sister's. Last year, I asked him what his favorite dessert was and he told me when he was a kid, he had these whoopie pies with crushed peppermint candies in them and that those were his favorite. I tried making them and experimented with different mints. I tried those soft, butter mints because I thought regular mints would be to crunchy, but he didn't like them as much. He said they're best with the crunchy kind. I also learned that when these mints sit on liquid, for example mixed with marshmallow whoopie pie filling, they tend to "melt" and become sticky. So, if you plan to add peppermints, which I highly recommend, don't stir them into the filling or roll the pies in them until right before serving them.



My mom and sister got me the cutest whoopie pie book last Christmas by Sarah Billingsley and Amy Treadwell called "Whoopie Pies: Dozens of Mix'em, Match'em, Eat'em Up Recipes". They have both sweet and savory recipes for the cakes and fillings that make it easy to mix and match flavors, not to mention great tips to have them come out perfectly every time. I'll add this fun little book to my books list for your convenience.
If you are a vegetarian, you are probably thinking "Marshmallows? Wait a second..." If you're not, you should know that marshmallows usually have gelatin in them and are therefore not vegetarian. However, much to my delight, marshmallow fluff does not contain gelatin, so you can enjoy these little sandwich cakes to you're heart's content.
Classic Whoopie Pies
Cakes:
1 2/3 cups all-purpose flour
2/3 cup unsweetened cocoa powder
1 1/2 tsp baking soda
1/2 tsp salt
4 tbs unsalted butter at room temperature
4 tbs vegetable shortening
1 cup packed dark brown sugar
1 large egg
1 tsp vanilla extract
1 cup milk
Position a rack in the center of the oven and preheat it to 375F. Line two baking sheets with parchment paper.
Sift together the flour, cocoa powder,baking soda and salt. In a bowl (either with a mixer with the paddle attachment or with a hand-held mixer), beat together the butter, shortening and brown sugar on low speed until just combined. Increase the speed to medium and beat until fluffy and smooth, about 3 minutes. Add the egg and vanilla and beat for another 2 minutes.
Add half the flour and half the milk to the batter and beat on low until just incorporated. Scrape down the sides of the bowl. Add the remaining flour and milk and beat until completely combined.
Using a spoon, drop about 1 tablespoon of batter onto one of the prepared baking sheets and repeat, spacing them at least 2 inches apart (they really do spread and puff up). Bake one sheet at a time for ten minutes each, or until the pies spring back when pressed gently. Remove from oven and let the cakes cool on the sheet for about 5 minutes before transferring them to a rack to cool completely.
Makes about 48, 2" cakes.
Filling:
1 1/2 cups Marshmallow Fluff
1 1/4 cups vegetable shortening
1 cup confectioner's (powdered) sugar
1 tbs vanilla extract
In the work bowl of a stand mixer with the paddle attachment, or in a large bowl with a hand-held mixer, beat together the marshmallow fluff and the vegetable shortening, starting on low and increasing to medium speed until the mixture is smooth and fluffy, about 3 minutes. Reduce mixer speed to low, add the confectioner's sugar and the vanilla, and beat until incorporated. Increase mixer speed to medium and beat until fluffy, about three minutes more.
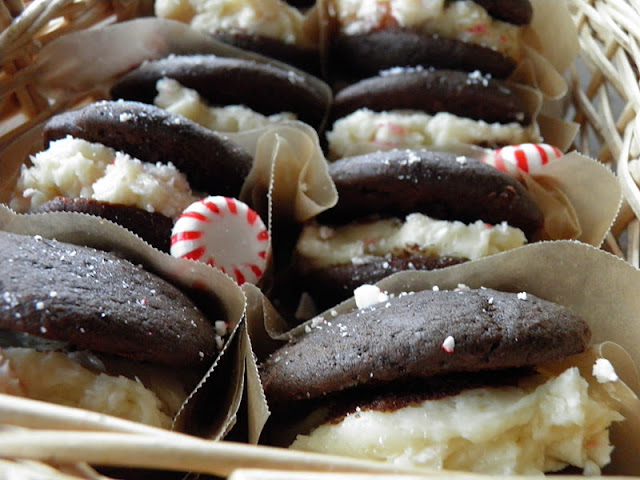
To assemble: You can pipe the filling between the cakes if you want or spoon it on. This is the stage where I add the crushed peppermint candies. I also like to break a few mints more finely and roll the edges of the whoopie pies in it when they are filled. This makes them very sparkly and glamorous (:
Happy birthday, Dad! <3

 |
| I love the contrast of the bright whites and red, I thought it was really stunning. |


My mom and sister got me the cutest whoopie pie book last Christmas by Sarah Billingsley and Amy Treadwell called "Whoopie Pies: Dozens of Mix'em, Match'em, Eat'em Up Recipes". They have both sweet and savory recipes for the cakes and fillings that make it easy to mix and match flavors, not to mention great tips to have them come out perfectly every time. I'll add this fun little book to my books list for your convenience.
If you are a vegetarian, you are probably thinking "Marshmallows? Wait a second..." If you're not, you should know that marshmallows usually have gelatin in them and are therefore not vegetarian. However, much to my delight, marshmallow fluff does not contain gelatin, so you can enjoy these little sandwich cakes to you're heart's content.
Classic Whoopie Pies
Cakes:
1 2/3 cups all-purpose flour
2/3 cup unsweetened cocoa powder
1 1/2 tsp baking soda
1/2 tsp salt
4 tbs unsalted butter at room temperature
4 tbs vegetable shortening
1 cup packed dark brown sugar
1 large egg
1 tsp vanilla extract
1 cup milk
Position a rack in the center of the oven and preheat it to 375F. Line two baking sheets with parchment paper.
Sift together the flour, cocoa powder,baking soda and salt. In a bowl (either with a mixer with the paddle attachment or with a hand-held mixer), beat together the butter, shortening and brown sugar on low speed until just combined. Increase the speed to medium and beat until fluffy and smooth, about 3 minutes. Add the egg and vanilla and beat for another 2 minutes.
Add half the flour and half the milk to the batter and beat on low until just incorporated. Scrape down the sides of the bowl. Add the remaining flour and milk and beat until completely combined.
Using a spoon, drop about 1 tablespoon of batter onto one of the prepared baking sheets and repeat, spacing them at least 2 inches apart (they really do spread and puff up). Bake one sheet at a time for ten minutes each, or until the pies spring back when pressed gently. Remove from oven and let the cakes cool on the sheet for about 5 minutes before transferring them to a rack to cool completely.
Makes about 48, 2" cakes.
Filling:
1 1/2 cups Marshmallow Fluff
1 1/4 cups vegetable shortening
1 cup confectioner's (powdered) sugar
1 tbs vanilla extract
In the work bowl of a stand mixer with the paddle attachment, or in a large bowl with a hand-held mixer, beat together the marshmallow fluff and the vegetable shortening, starting on low and increasing to medium speed until the mixture is smooth and fluffy, about 3 minutes. Reduce mixer speed to low, add the confectioner's sugar and the vanilla, and beat until incorporated. Increase mixer speed to medium and beat until fluffy, about three minutes more.
To assemble: You can pipe the filling between the cakes if you want or spoon it on. This is the stage where I add the crushed peppermint candies. I also like to break a few mints more finely and roll the edges of the whoopie pies in it when they are filled. This makes them very sparkly and glamorous (:
Happy birthday, Dad! <3
Thursday, November 17, 2011
Wednesday, November 16, 2011
Tuesday, November 15, 2011
Monday, November 14, 2011
Subscribe to:
Posts (Atom)